ย้าย Blog จาก GitHub Pages มาที่ DigitalOcean ตอน 2: #PERFMATTERS
ต่อจากตอนที่ 1 หลังจาก setup server พร้อมกับ deploy process เสร็จแล้ว ก็ถึงเวลาที่ต้อง optimize blog นี้ให้ไวขึ้น
Test, don’t guess
ก็คงเหมือนเวลาเราป่วย ก็ควรจะไปหาหมอเพื่อให้หมอตรวจดูอาการก่อน ไม่ควรพยายามรักษาเองทั้งๆ ที่ไม่รู้สาเหตุ เพราะอาจจะรักษาไม่หาย หรืออาจทำให้อาการหนักกว่าเดิม
Paul Lewis ได้กล่าวไว้ว่า “Don’t Guess it, Test it” คือเราควรจะใช้ tool เพื่อหาปัญหาด้าน performance ของแต่ละเว็บไซต์ แล้วแก้ให้ตรงจุดจะดีกว่า
ก่อนอื่นก็ต้องรู้ก่อนว่า สิ่งที่ควรปรับปรุงมีจุดไหนบ้าง ซึ่ง tool ที่ผมใช้ประจำก็คือ PageSpeed Insights นี่แหละ เพราะว่าเร็วและง่ายดี
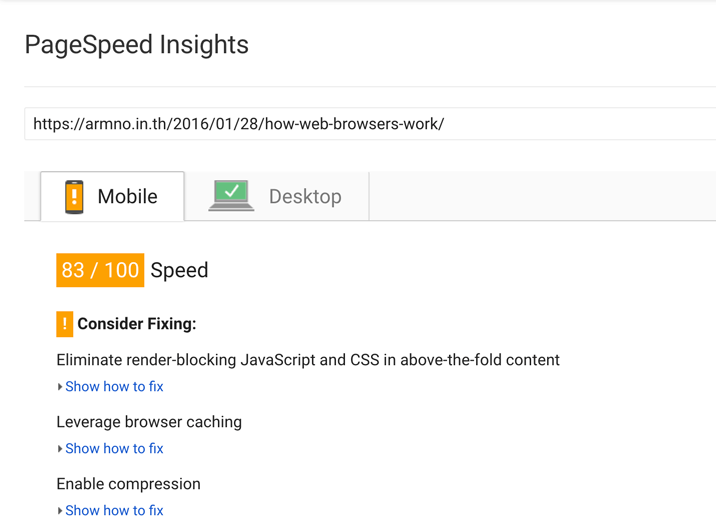
PageSpeed Insights บอกว่ามีสิ่งที่ควรปรับปรุงคือ
- ใช้งาน HTTP Caching (ตั้งค่า expiration time ของ static assets)
- ใช้งาน GZIP compression
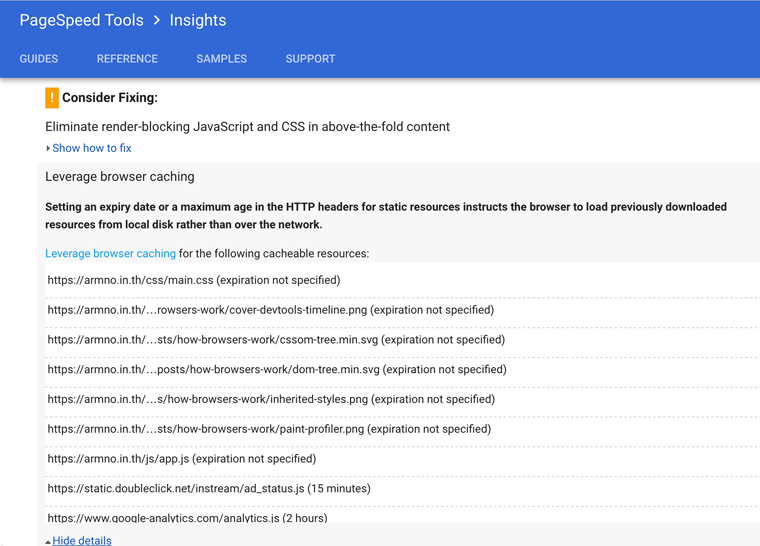
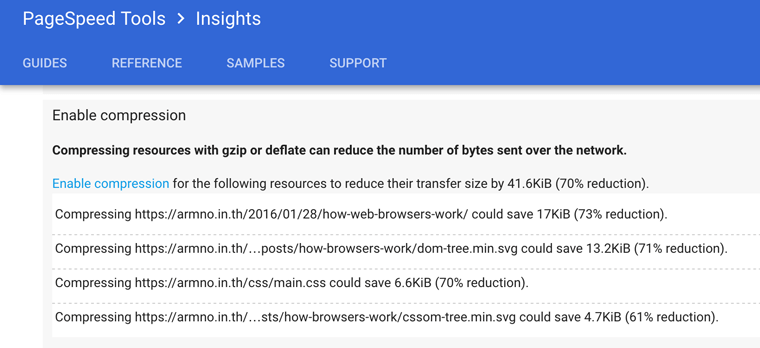
ทั้งสองอย่างต้องตั้งค่าที่ nginx โชคดีที่ทีม H5BP ทำตัวอย่าง config ของ nginx เอาไว้ที่ repo server-configs-nginx ซึ่งรวบรวมเอา best practices ต่างๆ ไว้ ผมก็เลยไปดูเป็นตัวอย่างและนำมาปรับใช้แบบบูรณาการ .. ก็คือลอกมานั่นเอง
เวอร์ชั่น Apache ก็มีเหมือนกันนะ
HTTP Caching
HTTP Caching เป็นการตั้งค่า header ของไฟล์ เพื่อบอกให้ browser รู้ว่าต้อง cache ไฟล์นี้หรือไม่ นานเท่าไหร่ มีประโยชน์คือ หากไฟล์ไฟล์นั้นถูก cache ไว้แล้ว และ cache ยังไม่หมดอายุ browser จะไม่จำเป็นต้องส่ง network request ไปที่ server อีก แต่จะดึงมาจาก cache แทน ทำให้ไฟล์นั้นโหลดได้ไวขึ้น ทุกๆ browser ในวันนี้ก็ support HTTP caching หมดแล้ว
ก่อนอื่นผม download config file ของ expire rules มาไว้ที่ /etc/nginx/conf.d/expires.conf บน server เอามาไว้ตรงนี้เผื่อว่าจะใช้เป็น config แชร์กันหลายๆ โดเมน
จากนั้นก็ include ไฟล์ข้างบนใน nginx config file ของโดเมนนี้ ซึ่งอยู่ที่ /etc/nginx/sites-enabled/armno.in.th
server {
  ...
  include conf.d/expires.conf;
  ...
}
save file แล้วก็ restart nginx ด้วย $ sudo service nginx restart
เปิดใช้งาน GZIP compression
GZIP ช่วยบีบอัดข้อมูลจำพวก text ให้มีขนาดเล็กลงได้มาก ทำให้ browser โหลดไฟล์ได้ไวขึ้น ซึ่งเราต้องไป config web server ของเราให้สามารถส่งไฟล์ gzip ผ่าน network request จาก browser ได้
ไฟล์ที่ต้องแก้ก็คือ /etc/nginx/nginx.conf โดยเพิ่ม config ที่เกี่ยวกับ gzip ใน http block ครับ (code เอามาจาก nginx.conf template ของ H5BP/server-configs/nginx)
http {
  ...
  # Enable gzip compression.
  gzip on;

  # Compression level (1-9).
  # 5 is a perfect compromise between size and CPU usage, offering about
  # 75% reduction for most ASCII files (almost identical to level 9).
  gzip_comp_level    5;

  # Don't compress anything that's already small and unlikely to shrink much
  # if at all (the default is 20 bytes, which is bad as that usually leads to
  # larger files after gzipping).
  gzip_min_length    256;

  # Compress data even for clients that are connecting to us via proxies,
  # identified by the "Via" header (required for CloudFront).
  gzip_proxied       any;

  # Tell proxies to cache both the gzipped and regular version of a resource
  # whenever the client's Accept-Encoding capabilities header varies;
  # Avoids the issue where a non-gzip capable client (which is extremely rare
  # today) would display gibberish if their proxy gave them the gzipped version.
  gzip_vary          on;

  # Compress all output labeled with one of the following MIME-types.
  gzip_types
  application/atom+xml
  application/javascript
  application/json
  application/ld+json
  application/manifest+json
  application/rss+xml
  application/vnd.geo+json
  application/vnd.ms-fontobject
  application/x-font-ttf
  application/x-web-app-manifest+json
  application/xhtml+xml
  application/xml
  font/opentype
  image/bmp
  image/svg+xml
  image/x-icon
  text/cache-manifest
  text/css
  text/plain
  text/vcard
  text/vnd.rim.location.xloc
  text/vtt
  text/x-component
  text/x-cross-domain-policy;
  ...
}
save file แล้วก็ restart nginx ด้วย $ sudo service nginx restart อีกครั้งหนึ่ง
Minify HTML output ของ Jekyll
ปกติ HTML output ของ Jekyll ในโฟลเดอร์ _site นั้นจะไม่ถูก minify ไว้ แต่เราสามารถทำได้ผ่าน plugin อย่างเช่น compressor.rb, minify-html หรือจะใช้วิธีที่ง่ายกว่านั้น คือ minify HTML ด้วย Liquid layout ซึ่งไม่ต้องใช้ plugin เลย ผมเลือกใช้วิธีนี้ครับ
วิธีการนั้นก็คือ download compress.html มาจากเว็บไซต์ ใส่ไว้ใน /layouts/compress.html แล้วก็ค่อยให้ default layout นั้นใช้ compress layout อีกทีหนึ่ง เพราะว่าเราสามารถใช้ layout jekyll ซ้อนกันได้หลายๆ ชั้น
/layouts/default.html
<!DOCTYPE html>
  ...
ลำดับชั้น layout ของ blog นี้ก็คือ post layout > default layout > compress layout > output ใน _site/ ตามลำดับ
จัดการ JavaScript ของ Disqus
Disqus เป็น comment widget ที่มี JavaScript ค่อนข้างเยอะถ้าเทียบกับขนาดทั้งหมดของเพจ (embed.js ขนาด 17.5KB ที่ไปโหลดไฟล์ JavaScript อื่นๆ มาอีกเกือบ 500KB) ยังดีที่ถูกโหลดเข้ามาแบบ asynchronous ทำให้ไม่ block การ render
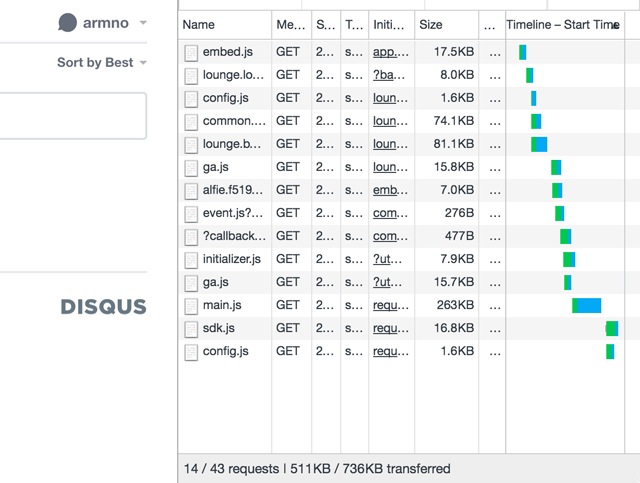
แต่ยังไง blog นี้ก็ไม่ค่อยมีใคร comment อยู่แล้ว (😭..) น่าจะดีกว่าถ้าตัด JavaScript ส่วนนี้ออกไป โดยที่ไม่จำเป็นต้องโหลดทุกครั้งที่แสดงผล แต่จะแสดงเมื่อจำเป็นเท่านั้น
ผมทำปุ่ม Show Comments คล้ายๆ ของ Medium.com เพื่อโหลด JavaScript ของ Disqus เมื่อกดปุ่ม แล้วแทนที่ปุ่มนั้นด้วยกล่อง comment วิธีนี้ ทำให้ไฟล์ JavaScript ทั้งหลายของ Disqus ถูกโหลดเข้ามาก็ต่อเมื่อผู้อ่านต้องการอ่านหรือเขียน comment เท่านั้น (on-demand) ประหยัด bandwidth ลดโลกร้อนครับ
วัดผลอีกครั้ง
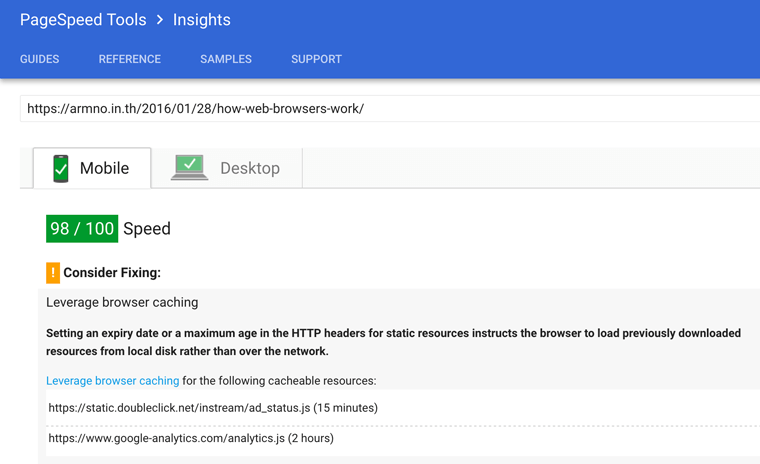
PageSpeed Insights บอกว่ายังคงเหลือไฟล์ JavaScript อีกบางส่วนที่ควรจะปรับปรุงเรื่อง expiration time แต่ทั้งเนื่องด้วยไฟล์นั้นถูกดึงมาจาก remote server (Google Analytics, YouTube) ที่ไม่สามารถคุม expiration time ได้ ก็คงต้องปล่อยไว้แบบนั้นครับ ส่วนไฟล์อื่นๆ ที่โหลดมาจาก server ตัวเองก็ถูก optimize ได้หมด
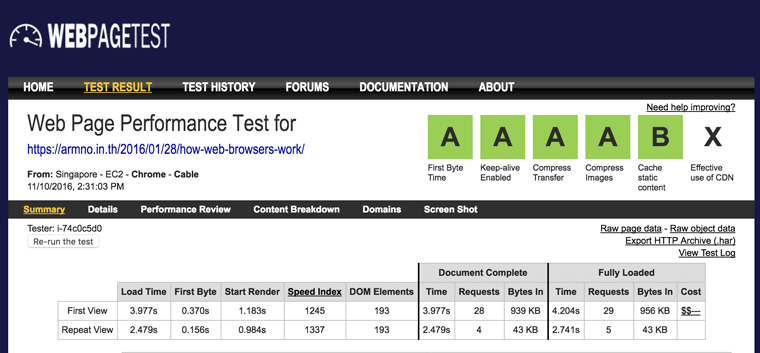
สามารถเช็คได้โดยใช้ webpagetest.org ซึ่งจะแสดงข้อมูลได้ละเอียดกว่า
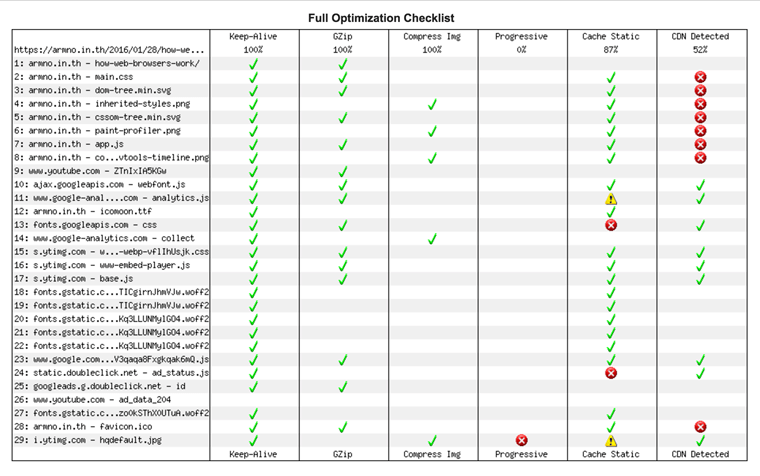
ดูได้ว่า static assets แต่ละไฟล์ มีการใช้งาน HTTP caching และ GZIP ไว้ทั้งหมด
สรุป
- ย้ายบ้านจาก GitHub Pages มาไว้ที่ DigitalOcean ได้
- ตั้งค่า expiration time ของ static assets ได้จาก config ของ nginx
- เปิดใช้งาน GZIP compression ได้จาก config ของ nginx
- ใช้
compress.htmllayout ของ jekyll เพื่อ minify output HTML - โหลด Disqus JavaScript แบบ on-demand
- inline critical CSS ด้วย
loadCss
ถึงแม้ว่า blog นี้จะเป็นแค่ static website ธรรมดาๆ ที่ไม่ค่อยมี CSS หรือ JavaScript แต่ก็ยังพอมีส่วนอื่นๆ ที่สามารถ optimize ให้ load และ render เร็วขึ้นได้ สนุกดีครับ
Related posts
